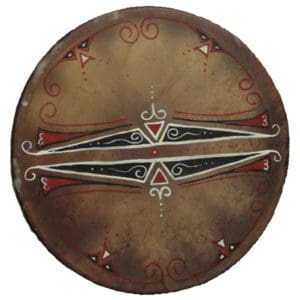
A Hand Drum is a traditional Native American instrument. You will see them played at Powwows, ceremonies and drum circles. Make your own Single Sided Hoop Hand Drum and use as is, or decorate yours with paint!
Materials Needed:
- Wood Drum Frame
- Rawhide Round
- 1/4″ wide Rawhide Lacing
- Deerskin lacing or other ties
- Large plastic container or tub
- Towels/ Paper towels
- Leather Hole Punch or Awl
- Heavy Scissors
For the Drum Beater you need:
- Wood Dowel or stick
- Plastic Tape (like electrical tape)
- Piece of Deerskin Leather & Deerskin Lacing
Please read all instructions before you begin. Confirm that you have all the components required.
Prepare the Rawhide and Rawhide Lacing
Fill a container large enough to hold hot water to cover both the Rawhide and the Lacing. (bathtubs work!). Soak the Rawhide and the Lacing before you start. Soaking in hot water relaxes the Rawhide and allows it to stretch. Allow them to soak for 1 day. You may allow the ends of the Lacing to remain out of the water.
After soaking the Rawhide and Lacing for 1 day, add more hot water to it about 1/2 hour before you want to start. Use paper towels or cloth to blot the excess water from the Rawhide and Lacing. Then move them to a cloth or towel covered table.
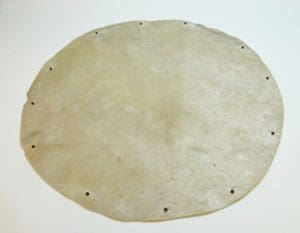
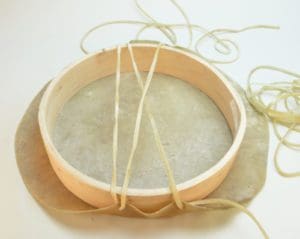
Place the SMOOTHEST side of the Rawhide face down on the table. Punch Holes in the Rawhide with a Leather Hole Punch or an Awl. Fold the Rawhide in half. Punch two holes through the Rawhide at each side of the fold about 1/2” from the edge. Then unfold the Rawhide and fold it again in the other direction. Line up the first two holes and punch two more holes at the fold about 1/2” from the edge. Open the Rawhide and lay it flat. Punch 2 more holes between each of the four holes you have already punched. These should be 1/2” from the edge and spaced an even distance apart. With the smooth side of the Rawhide facing down, center the Wood Drum Frame on it.
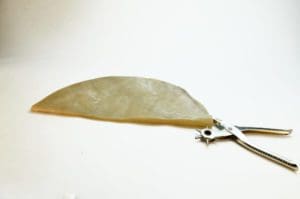
Cut the ends of the Lacing to a point so they will go through the holes easily. Double the Lacing over to find the center. You will work with one half at a time. Do not cut it. Draw one end of the Lacing through one hole from bottom to top as shown.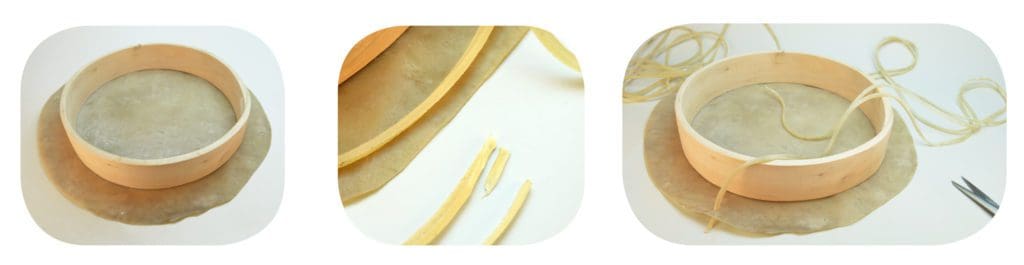
 Make the Hand Drum
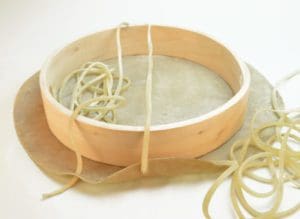
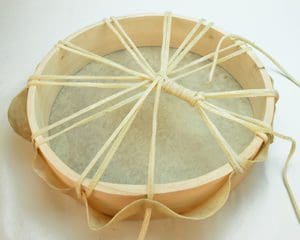
Draw the same end of the Lacing through the opposite hole [as shown] from bottom (inside) to top (outside) of the Rawhide. Bring the same end of the Lacing over the Drum Frame to the hole on the left of the first hole and draw it through. Then take the same end and lace it through the hole to the right of the 2nd hole. Continue to draw the Lacing through the holes to the left and right of the last one until you don’t have enough to continue. Lastly, Tie the end of the Lacing off loosely to one of the cross laces.
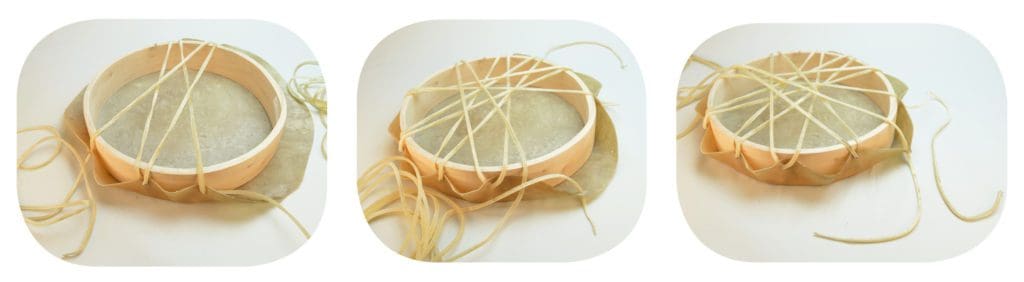
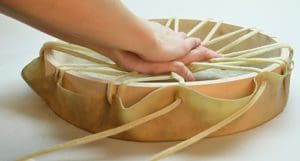
Pick up the other end of the Lacing and continue, starting with the next available hole. Continue working back and forth until all of the holes have been laced. When you have finished lacing the Rawhide, tighten the Lacing by pulling on it, following the same order of the original lacing. Keep the Lacing and the Rawhide centered. Adjust the position of them as needed. You may find it helpful to tie the ends loosely to a cross lace in the center. Press down on the center of the cross Lacing to stretch the Rawhide. Then turn the Drum Frame over and press down in the center of the Rawhide, too. This will stretch both the Rawhide and the Lacing. Pull the Lacing tight again, following the same order of the original lacing. Repeat these steps if needed. The Rawhide will remain pliable until it dries.
 Now that you have the Lacing slightly stretched, bring one of the ends under and around the center spot. Wrap the Lacing
 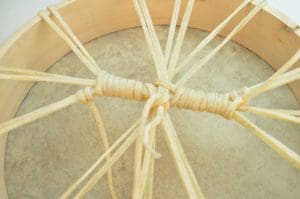 around three adjacent strands of cross lacing. This helps to tighten the Lacing. Tie the end to one of the cross laces in an overhand knot. Do the same with the other end of the Lacing with another section of cross strands. Tie the end in an overhand knot on one of the cross laces. Cut the Lacing off an inch from the knot.
Tie one end of the cut piece of Lacing to the center of the cross lace. Starting at the center, wrap it around three unbound strands of cross lacing. Tie the end in an overhand knot to one of the cross laces. Repeat these steps with a second cut piece of Lacing on the remaining unbound strands.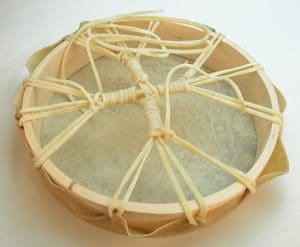
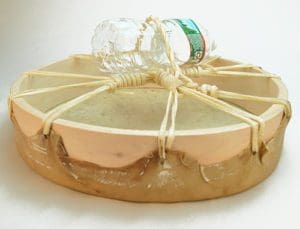
Make a Handle
Take the loose end of one of the pieces of Lacing. Then drape the loose Lacing over your hand or a bottle to create a handle loop. Bring the loose end underneath the cross lacings. Take both loose Lacings and wrap them around the loop you created when you draped the Lacing over your hand (or bottle). Knot them together when you get to the other side. Cut the ends about 1/2” from the knot. Place something underneath the wrapped handle to allow it keep its shape while it dries. You can also make a handle with a separate piece of Deerskin Lacing or Strap Leather.
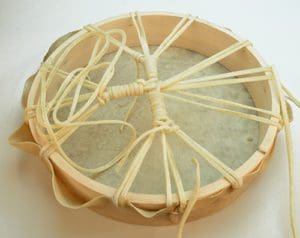
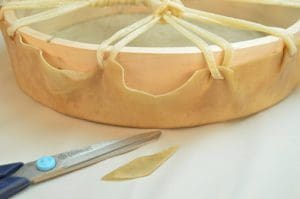 The Rawhide around the rim will have pleats or puckers. You may cut out half circle sections of the Rawhide in between the laces if you wish. Wr
 ap a piece of Deerskin Leather Lacing around the edge of the Drum Frame to compress the Rawhide against Drum Frame. Make sure it covers the puckers and holds them to the frame. When the Rawhide starts to become stiff, remove the Deerskin Leather Lacing and let the Drum dry completely. Then allow the Drum to dry for at least 24 hours. Keep it out of direct sunlight and away from heat sources while it dries. You can use your Drum plain or decorate it with acrylic paint or powdered pigment paints.
Make Your Own Hand Drum Stick
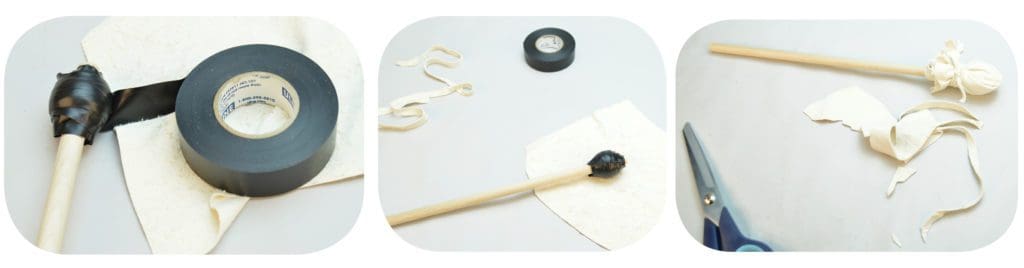
Wrap some of the Plastic Tape around the one end of the Wood Dowel or stick about 1 inch from the end. Wrap it loosely then squeeze it together to form a ball abo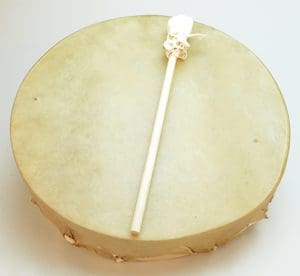 ut 1 inch thick. Fold the Deerskin Leather over the tape. Wrap the Deerskin Leather Lacing around the stick to hold the Deerskin Leather to it and tie it in a knot. Lastly, cut off any excess leather at the bottom.
Caring for Your Drum
Moisture in the air will affect the Rawhide on your drum. If the Drum gets damp, you may need to set it out in the sun to dry out before you use it.
Ready to get Started? Click on the Links Below for your Supplies or try our Hand Drum Kit
-

Drum Frames
Price range: $28.95 through $46.95 Select options This product has multiple variants. The options may be chosen on the product page -

Rawhide Rounds for Drums
Price range: $30.00 through $75.00 Select options This product has multiple variants. The options may be chosen on the product page -

Rawhide Lacing
Price range: $9.75 through $54.00 Select options This product has multiple variants. The options may be chosen on the product page -

Deerskin Lace – 5 feet x 1/4 inch
$4.00 Select options This product has multiple variants. The options may be chosen on the product page