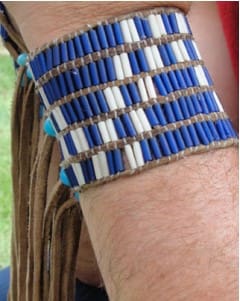
How to make a Wampum Bead Bracelet
A Wampum Bead Bracelet will perfectly complement your Eastern Woodlands Regalia! Follow these step by step instructions to learn how to use a loom to make your own.
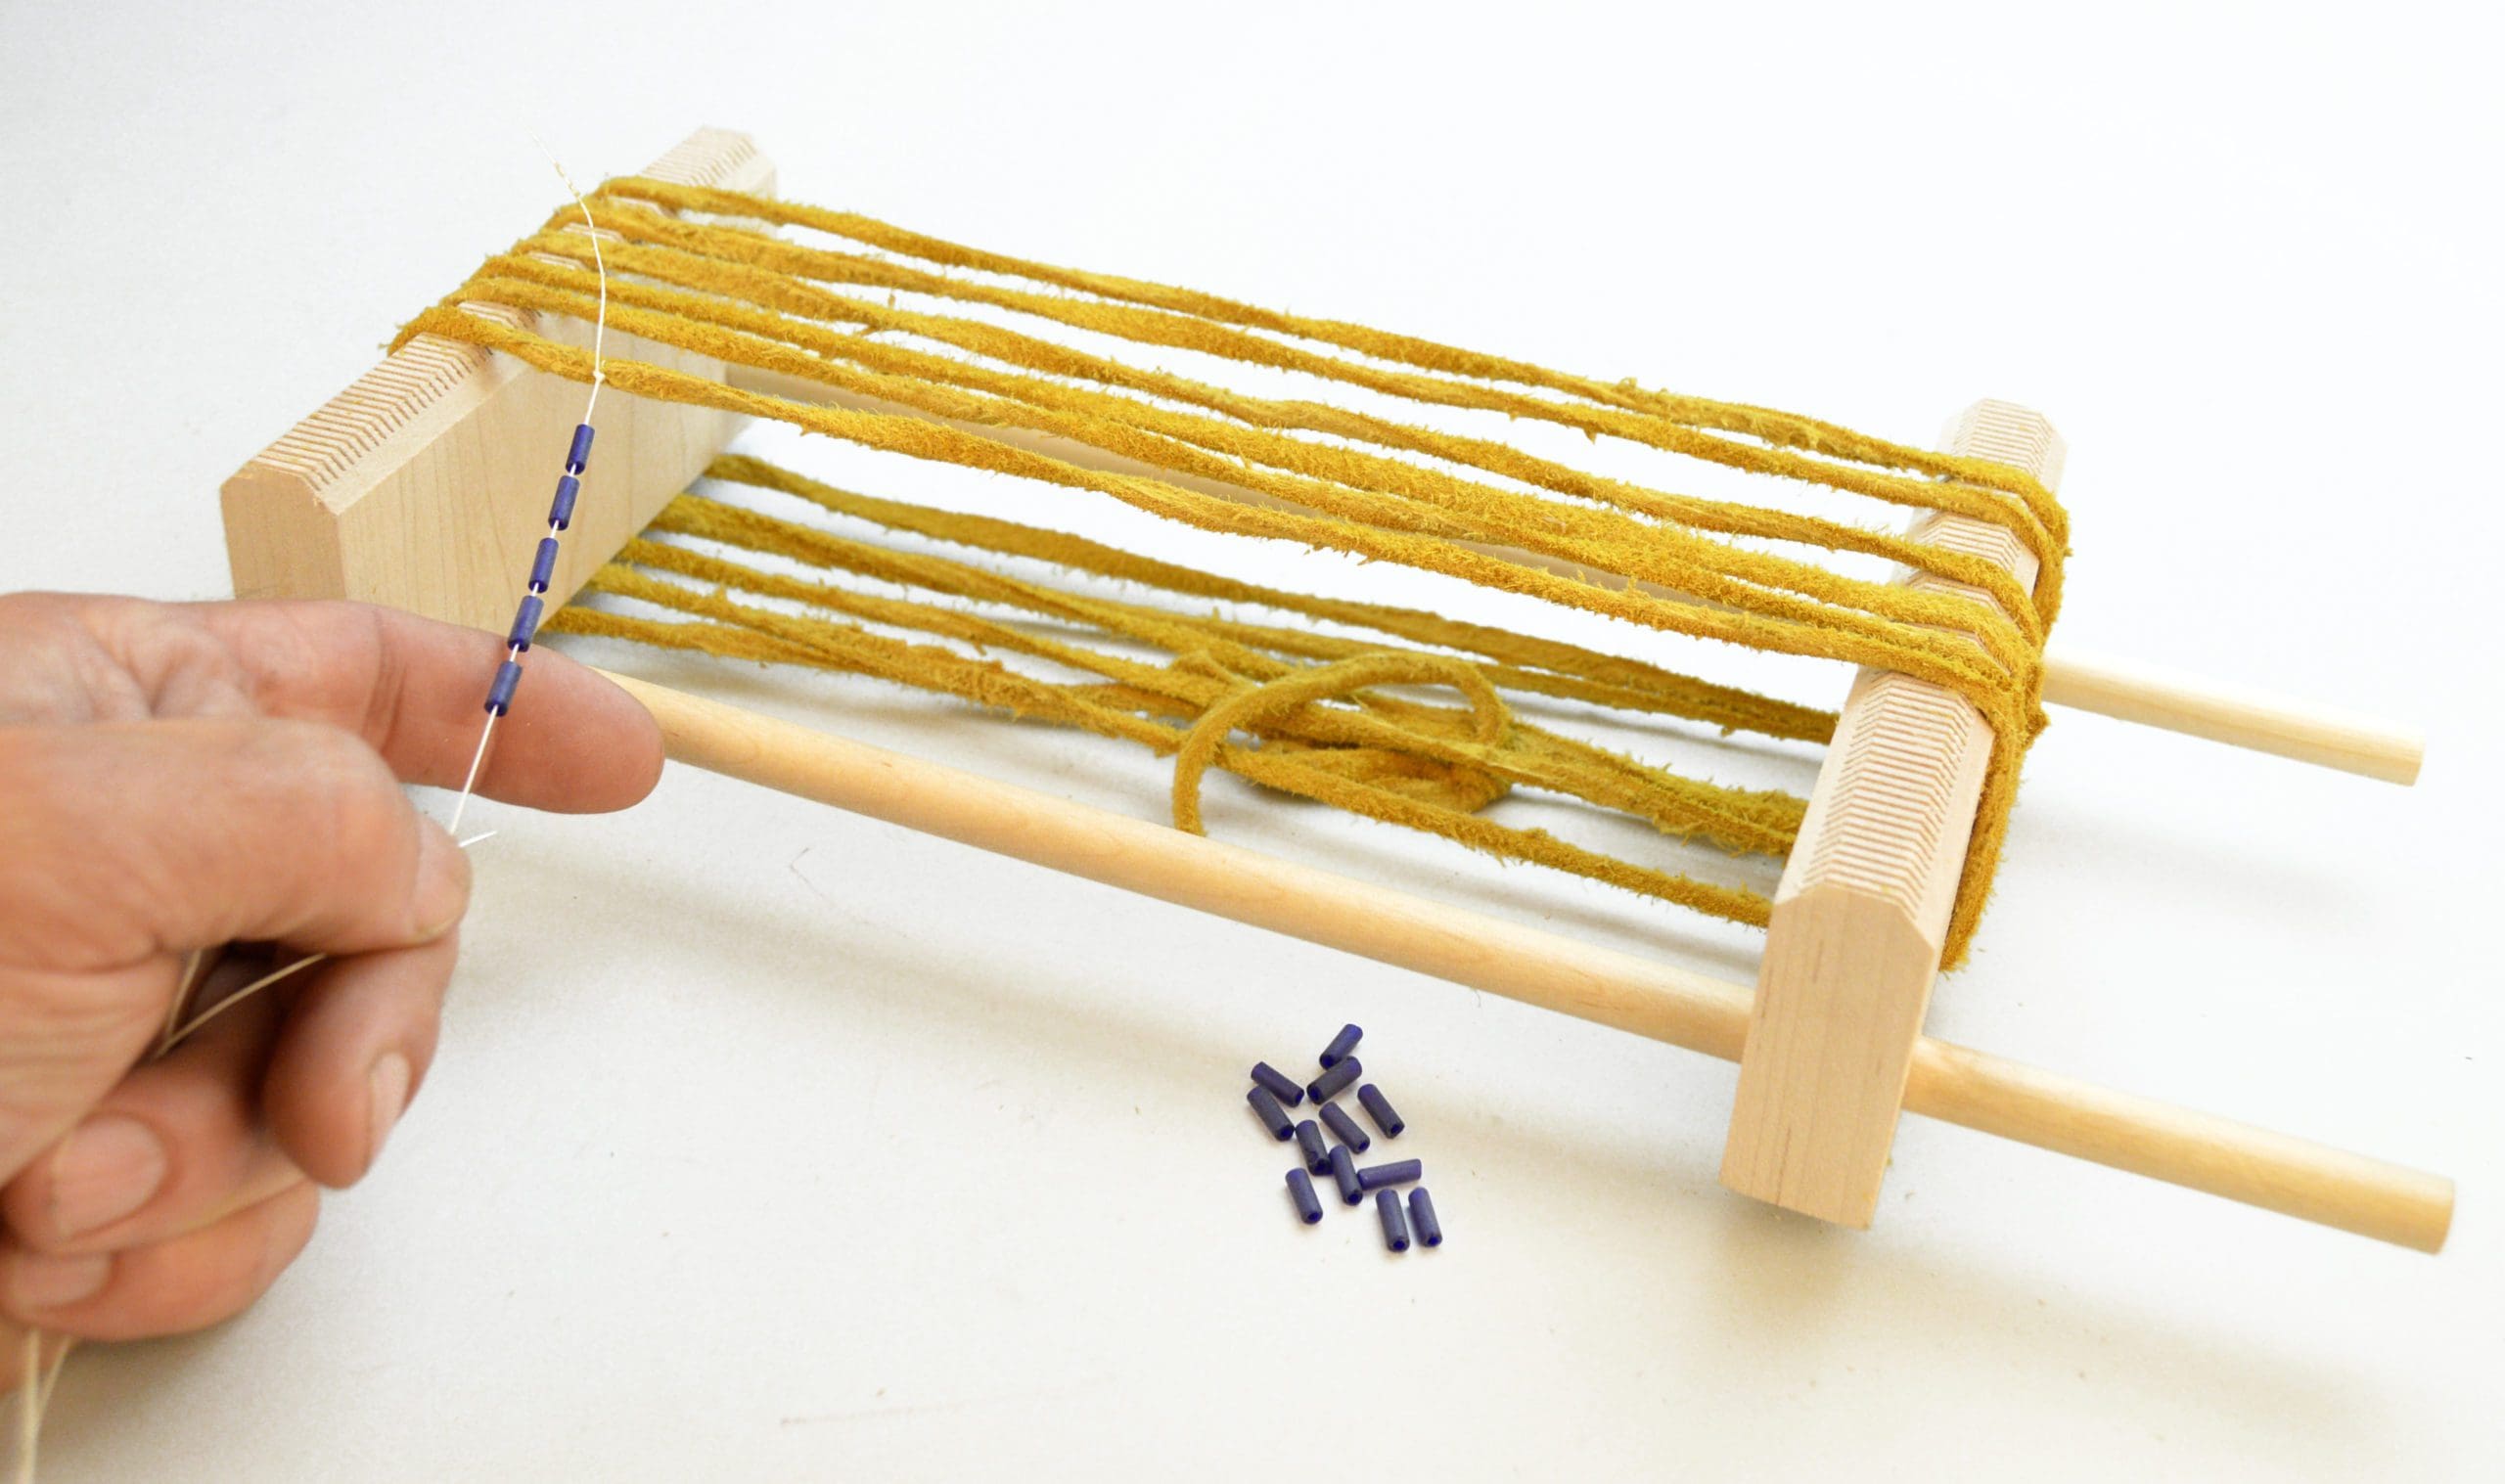 1. You can purchase one of our Bead Looms or make a simple loom from wood or cardboard. Set the loom so you have a working space 6” long and at least 5” wide.
2. Hold one end of the Leather Warp Lacing in the middle of the underside of the loom. Wrap the Warp Lacing completely around the loom the long way, leaving about 1/2” between each wrap. Continue until you have the desired number of Warp Laces. (For a Bracelet 5 beads wide, you will need to string 6 Warp Laces across). To achieve the best results, be sure to make the Warp Lace tight and maintain uniform tension. Then, tie the two loose ends together under the loom.
3. Select a design from the back page of these instructions or graph out your own 5 row design.
4. Thread the needle with about 2 feet of NYMO Thread. Then tie the loose end of the Thread to one of the outer Warp Lacing pieces.
 5. Use a needle to pick up five beads for the first line of your design, in their proper order. (Fig 1)
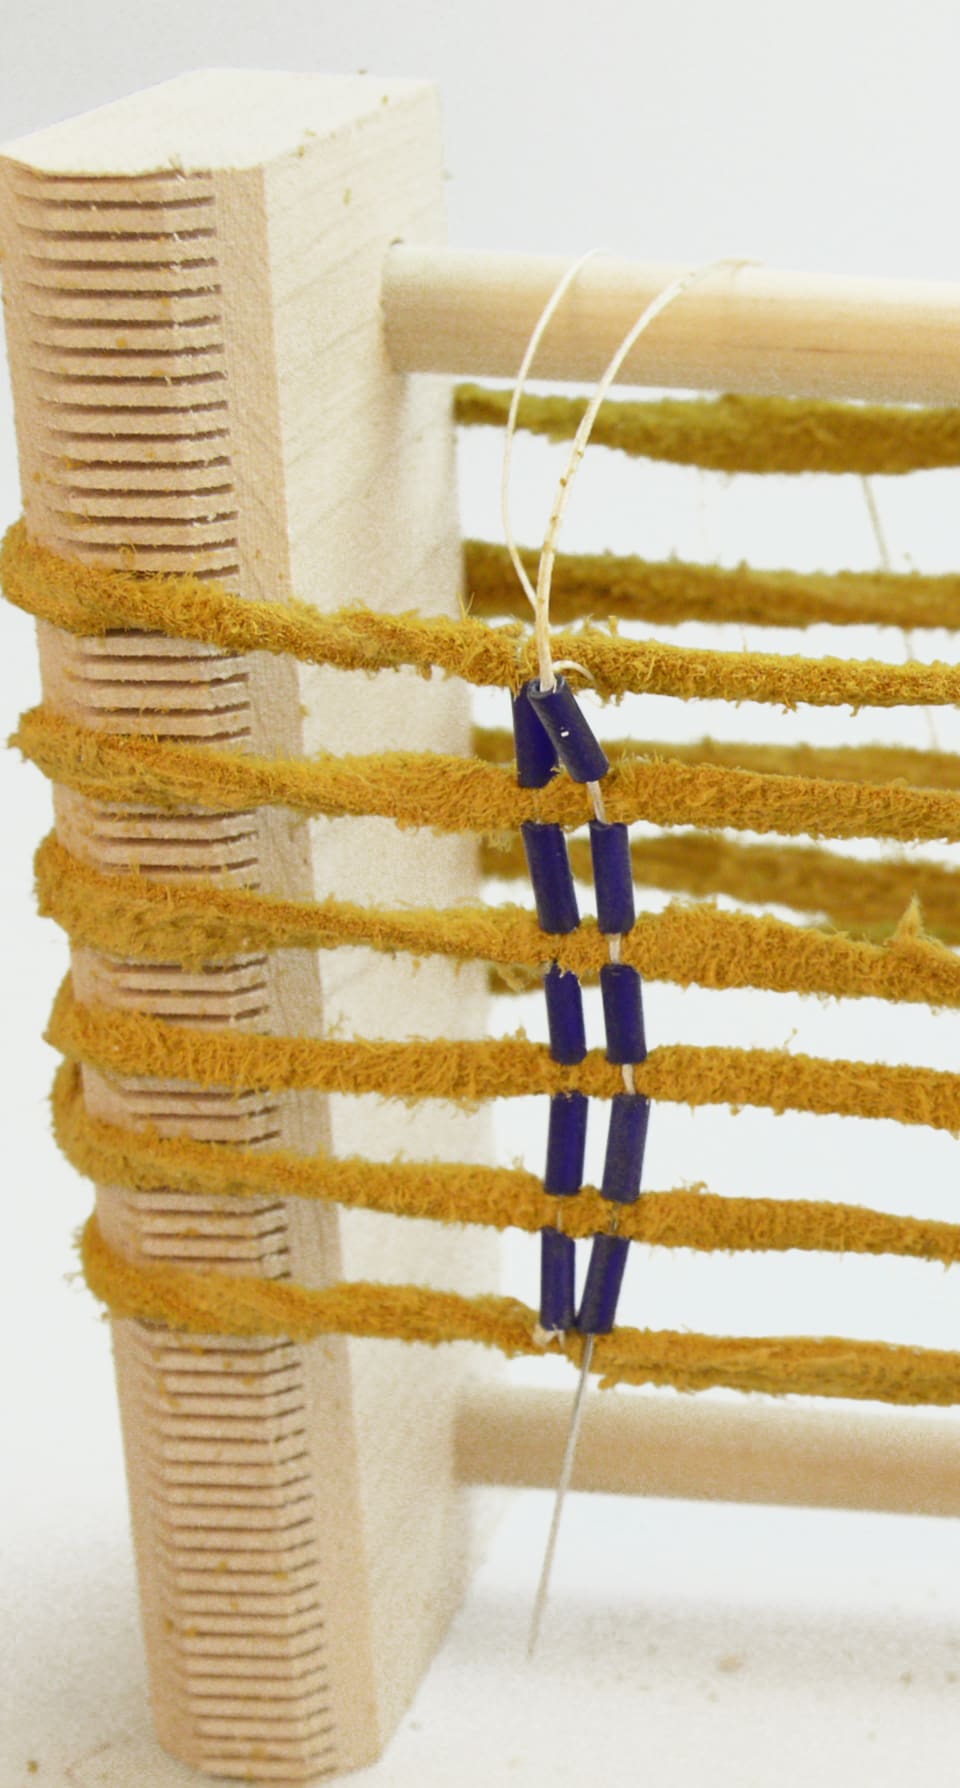
6. Place these beads UNDER the Warp Lacing, pushing one bead between two laces, one bead in each space. (Fig 2)
7. Pass the needle back through the beads in the opposite direction. This time the needle and thread should pass ABOVE the rows of Warp Lacing. Pull the thread snug so the beads are drawn close together. (Fig 3)
8. As you progress, you will use up the NYMO thread. When you have 4” – 5” of thread left, tie the end to an outer Warp Lace.
9. Thread the needle again. Tie the loose end next to where you tied the end of the previous thread on the outer Warp Lace. Continue until you have finished your design. When making a Bracelet, stop after you have completed 5” – 6” of beadwork that will fit around your wrist. When your Bracelet is completed, tie off the NYMO thread on an outer Warp Lace. Cut the loose ends of the NYMO thread with scissors.
10. Firstly, cut the Warp Lace in the middle from the underside of the loom where you tied the ends together. This ensures that you have even lacing fringe on each side. Next, pair up each strand of Lacing fringe. Then, slide a Crow Bead over each pair to create an adjustable closure. Finally, trim the lacing to your preferred length.
A Short History of Wampum
 Wampum beads were originally crafted from Quahog Clam shells and Whelk shells. Over time, Native Americans from Northeastern North America began using them to create necklaces, belts, arm bands, and decorative elements for clothing. Additionally, Wampum shell was shaped into discs and cylindrical straight-sided beads, each about 1/8” long with a hole drilled through the center. Furthermore, colored Wampum held special significance for the Iroquois. Specifically, purple beads, known as ‘black wampum,’ played a vital role in political communication. White wampum symbolized purity and faith. Up to about 1693, Natives used wampum as a form of trade currency. Iroquois Wampum Belts were used as signs of agreement when treaties were formalized.
The designs woven into the belts could represent the terms of the treaty. Designs included several shapes including hollow squares, hexagons, diamonds, crosses, diagonal lines, houses, animals and human figures. One of the oldest known Wampum Belts is the Hiawatha Belt, which dates to the mid-16th century. Notably, it recorded the formation of the League of the Iroquois. Furthermore, this belt features a pattern with four hollow squares outlined in white and a white tree-shaped design in the center, all connected by white lines. Importantly, the five nations represented in this belt were the Seneca, the Cayuga, the Onondaga, the Oneida, and the Mohawk.
Read more about Wampum Bead history!
Don’t miss our How To videos on our YouTube Channel!
-

Wampum Beads – Clay
Price range: $6.95 through $159.95 Select options This product has multiple variants. The options may be chosen on the product page -

Ojibwa Bead Loom
$19.95 Add to cart -

Wampum Warp Lace
Price range: $17.95 through $40.95 Select options This product has multiple variants. The options may be chosen on the product page